Test Complete
- Questions
- Score
- Minutes
| Overall Results | |
|---|---|
| Total Questions |
| Category Results | |
|---|---|
Needle Cricothyrotomy Procedure
Category: Airway
Topic: Advanced Airway Management
Level: Paramedic
Next Unit: Surgical Cricothyrotomy Procedure
10 minute read
Needle Cricothyrotomy Procedure
A needle cricothyrotomy is a last-ditch, very temporary procedure used in an effort to save a life when all other means of accessing the airway have been exhausted. It is useful when the airway is completely obstructed. It involves the passing of a small needle into the trachea that is connected to high-pressure oxygen, forcing sufficient air to stabilize the patient through a tiny aperture temporarily.
Indications, Contraindications, Complications, and Limitations
INDICATIONS: A needle cricothyrotomy is used when the patient has an upper airway abnormality that prevents intubation, and a surgical cricothyrotomy is unrealistic or impossible. It is also used in patients under 12 years of age. The main indications for cricothyrotomy are complete upper airway obstruction, glottic edema, fractured larynx, severe oropharyngeal trauma with bleeding, and upper airway deformity.
CONTRAINDICATIONS: Needle cricothyrotomy has no absolute contraindications, it is a last-ditch procedure that is used when all else fails. Insufficient training is the only thing that should stop you from performing the procedure if it is indicated.
COMPLICATIONS: The complications listed in the section "percutaneous cricothyrotomy" are all relevant to needle cricothyrotomies. There is a lower risk of serious bleeding but a greater risk of insufficient respiration and resulting hypoxia.
LIMITATIONS: The limitations of the needle cricothyrotomy when compared to the classical surgical approach are due to the size of the hole that is made in the trachea. The extremely small (12-gauge) hole only allows a small volume of oxygen to pass to the lungs. Without rapid transport and definitive care in a well-equipped hospital, these patients will quickly die.
Needle Cricothyrotomy Necessary Equipment
- A 12 or 14-gauge over-the-needle catheter with a 10 mL syringe attached.
- Alcohol or Povidone-iodine swabs.
- Adhesive medical tape or appropriate ties.
- Pressure regulating valve and a pressure gauge attached to a high-pressure oxygen supply.
- High pressure (30-60 psi) oxygen supply. Note: Most oxygen regulators can provide 50 psi at 15 Lpm oxygen flow.
- High-pressure tubing connecting the high-pressure regulator valve to a hand-controlled release valve. Note: A 5-foot tubing set is recommended.
- A release valve connected by tubing to the catheter. Note: This may be accomplished using a "Y" or "T" connector, a 3-way stopcock attached to the high-pressure tubing, or by cutting a hole in the tubing to provide a "whistle-stop" effect.
Needle Cricothyrotomy Procedure
- Position the patient supine with good access to the base of the neck (hyperextended head/neck).
- Apply lidocaine (if indicated and protocols allow) and cleanse the site with an antiseptic solution such as Betadine.
- Identify your landmarks:
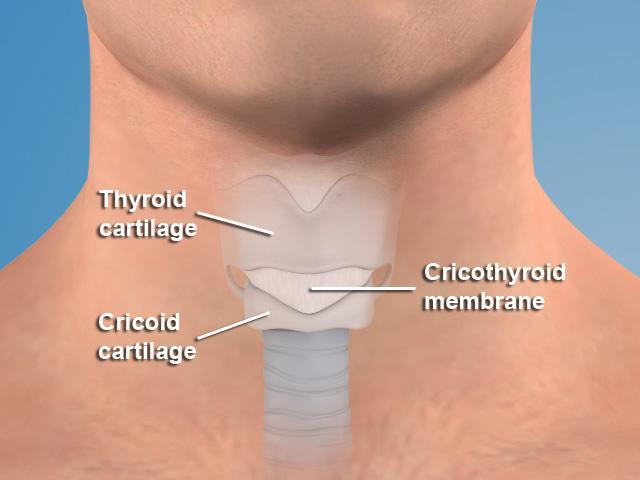
• Thyroid cartilage.
• Cricoid cartilage.
• The cricothyroid membrane between them. - Palpate the thyroid cartilage (the first prominent landmark on the anterior neck), the cricoid cartilage (a second "bump" inferior to the thyroid cartilage) and the area between them (this is the cricothyroid membrane).
- Using the non-dominant hand, stabilize the area by placing the thumb and middle finger on both sides of the thyroid cartilage, allowing the index finger to find your landmarks and palpate the membrane.
- With the dominant hand, insert the 12 to 14 gauge angiocath attached to the syringe filled with normal saline into the membrane at a downward 45-degree angle.
- Although the cords should be safe, they are only 0.5-2 cm above the entrance site, pointing the angiocath downward (caudal) will protect them from injury.
- Advance the catheter while withdrawing the plunger on the syringe. When the catheter reaches the trachea, a distinct pop can be felt and air bubbles will appear in the syringe.
- Advance the catheter and remove the needle/syringe.
- Use a jet ventilation device at 15 Lpm oxygen or attach the barrel of a 3-ml syringe to the catheter and place an ET tube adapter into the other end of the barrel.
- Attach a BVM and deliver oxygen through ventilation.
This procedure delivers a large volume of oxygen (50 psi) through a small port at high pressure to the lungs. But, this procedure is temporary, at best! Translated, rapid, safe transport is imperative for a positive outcome.